4.docker-compose学习
1. 目标
熟悉docker-compose概念以及docker-compose安装。
2. docker-compose是什么
docker-compose是用于定义和多容器应用程序运行的工具。docker-compose可以使用YAML文件来配置应用程序,然后使用一个命令,实现从配置到创建并启动所有服务的功能。
3.docker-compose特性:
3.1 单个主机上的多个环境隔离
docker-compose使用项目名称将环境彼此隔离。 你可以在不同的上下文中使用这个项目名称: 1)在开发主机上,创造一个环境的多个副本,例如当你想要运行一个项目的多个稳定的分支副本。 2)在CI服务器上一个项目,为了防止构建相互干扰,可以将项目名称设置为一个唯一的构建编号。 3)在共享的主机或dev主机上,为了防止不同的项目相互干扰,可以使用相同的服务名称。 默认的项目名称是项目的目录名称,可以使用-p命令 或者COMPOSE_PROJECT_NAME environment variable来指定项目名称。
3.2 在容器创建时保存卷数据
当docker-compose up运行的时候发现有之前运行过的容器,它会把老的容器的卷数据拷贝过来,这个操作能确保卷数据不被丢失。
3.3 只创建有改动的容器
docker-compose会缓存创建过的容器的配置,当你启动一个没有修改过的服务的时候,docker-compose会重新使用存在的容器,
3.4 可以使用环境变量
docker-compose支持读取环境变量,利用这一点,我们可以为不同的环境或者不同的用户定制docker-compose 例如我们有环境变量POSTGRES_VERSION=9.3,我们就可以这样使用:
   db:
     image: "postgres:${POSTGRES_VERSION}"
docker-compose运行的时候会获取环境变量POSTGRES_VERSION并替换,docker-compose会把image解析为postgres:9.3 如果环境变量没有设置,POSTGRES_VERSION会被替换为空postgres: 我们也可以用.env文件来设置默认的环境变量,docker-compose会自动寻找并替换。环境变量设置会覆盖.env文件设置 重要:.env文件只在使用docker-compose up命令时生效,使用docker start deploy时无效 $VARIABLE和${VARIABLE}语法都是支持的, 在2.1 文件格式 里面支持设置默认值: ${VARIABLE:-default} 会设置默认值为default,如果变量VARIABLE没有设置环境变量或者设置为空。 ${VARIABLE-default} 会设置默认值为default,仅在VARIABLE没有设置环境变量的时候。 类似地,下面的语法允许指定强制变量: ${VARIABLE:?err} 会退出运行并返回一个err信息,如果变量VARIABLE没有设置环境变量或者设置为空。 ${VARIABLE?err} 会退出运行并返回一个err信息,仅在VARIABLE没有设置环境变量的时候。 我们还可以使用$$(两个美元符号)来代替配置中的$,使用$$会使得docker-compose忽略不处理
   web:
     build: .
     command: "$$VAR_NOT_INTERPOLATED_BY_COMPOSE"
如果忘记使用$$而使用单个美元符号$,docker-compose会将该值解释为环境变量,提示VAR_NOT_INTERPOLATED_BY_COMPOSE没有设置环境变量, 并替换一个空字符串。
4. docker-compose 安装
4.1 下载docker-compose
wget https://github.com/docker/compose/releases/download/1.24.0/docker-compose-Linux-x86_64
4.2 查看版本
   # mv docker-compose-Linux-x86_64 /usr/local/bin/docker-compose
   # chmod 777 docker-compose
   # docker-compose --version
   docker-compose version 1.24.0, build 0aa59064
4.3 卸载
rm /usr/local/bin/docker-compose
5. docker-compose 使用
本实例使用python和redis实现一个计数器的功能,虽然使用的是python,但是本实例演示的概念应该是很容易理解的,即使对于不熟悉python的人
5.1 准备条件
安装了docker和docker-compose(不需要安装redis和python,因为镜像里都有)
5.2 设置
1)创建工程目录
   $ mkdir composetest
   $ cd composetest
2)创建app.py文件
   import time

   import redis
   from flask import Flask


   app = Flask(__name__)
   cache = redis.Redis(host='redis', port=6379)


   def get_hit_count():
       retries = 5
       while True:
           try:
               return cache.incr('hits')
           except redis.exceptions.ConnectionError as exc:
               if retries == 0:
                   raise exc
               retries -= 1
               time.sleep(0.5)


   @app.route('/')
   def hello():
       count = get_hit_count()
       return 'Hello World! I have been seen {} times.\n'.format(count)

   if __name__ == "__main__":
       app.run(host="0.0.0.0", debug=True)
在本实例中,把redis作为redis容器的hostname,默认端口6379。 3)创建requirements.txt文件
   flask
   redis
5.2 创建Dockerfile
编写一个Dockerfile来构建Docker镜像,包含Python应用程序所需的所有依赖项,包括Python本身。
   FROM python:3.4-alpine #从Python 3.4映像开始构建一个映像。
   ADD . /code #添加当前目录。输入图像中的路径/代码。
   WORKDIR /code #将工作目录设置为/code。
   RUN pip install -r requirements.txt #安装Python依赖项。
   CMD ["python", "app.py"] #将容器的默认命令设置为python app.py。
5.3 创建docker-compose.yml文件
   version: '3'
   services:
     web:
       build: .
       ports:
        - "5000:5000"
     redis:
       image: "redis:alpine"
配置文件里面定义了两个服务,web和redis,其中web服务使用当前目录下Dockerfile编译的镜像,端口使用Flask默认端口5000, 并映射外部的5000端口。redis服务使用公共库里面的镜像。
5.4 利用docker-compose打包运行App
1)运行docker-compose命令
   $ docker-compose up
   WARNING: The Docker Engine you're using is running in swarm mode.

   Compose does not use swarm mode to deploy services to multiple nodes in a swarm. All containers will be scheduled on the current node.

   To deploy your application across the swarm, use `docker stack deploy`.

   Creating network "composetest_default" with the default driver
   Building web
   Step 1/5 : FROM python:3.4-alpine
   3.4-alpine: Pulling from library/python
   8e402f1a9c57: Pull complete
   cda9ba2397ef: Pull complete
   aafecf9bbbfd: Pull complete
   bc2e7e266629: Pull complete
   e1977129b756: Pull complete
   Digest: sha256:c210b660e2ea553a7afa23b41a6ed112f85dbce25cbcb567c75dfe05342a4c4b
   Status: Downloaded newer image for python:3.4-alpine
    ---> c06adcf62f6e
   Step 2/5 : ADD . /code
    ---> 7f957b8de56c
   Step 3/5 : WORKDIR /code
    ---> Running in 39a117b8de16
   Removing intermediate container 39a117b8de16
    ---> 0c78617fea0b
   Step 4/5 : RUN pip install -r requirements.txt
    ---> Running in 38a3c9656713
   DEPRECATION: Python 3.4 support has been deprecated. pip 19.1 will be the last one supporting it. Please upgrade your Python as Python 3.4 won't be maintained after March 2019 (cf PEP 429).
   Collecting flask (from -r requirements.txt (line 1))
     Downloading https://files.pythonhosted.org/packages/7f/e7/08578774ed4536d3242b14dacb4696386634607af824ea997202cd0edb4b/Flask-1.0.2-py2.py3-none-any.whl (91kB)
   Collecting redis (from -r requirements.txt (line 2))
     Downloading https://files.pythonhosted.org/packages/ac/a7/cff10cc5f1180834a3ed564d148fb4329c989cbb1f2e196fc9a10fa07072/redis-3.2.1-py2.py3-none-any.whl (65kB)
   Collecting itsdangerous>=0.24 (from flask->-r requirements.txt (line 1))
     Downloading https://files.pythonhosted.org/packages/76/ae/44b03b253d6fade317f32c24d100b3b35c2239807046a4c953c7b89fa49e/itsdangerous-1.1.0-py2.py3-none-any.whl
   Collecting Werkzeug>=0.14 (from flask->-r requirements.txt (line 1))
     Downloading https://files.pythonhosted.org/packages/18/79/84f02539cc181cdbf5ff5a41b9f52cae870b6f632767e43ba6ac70132e92/Werkzeug-0.15.2-py2.py3-none-any.whl (328kB)
   Collecting click>=5.1 (from flask->-r requirements.txt (line 1))
     Downloading https://files.pythonhosted.org/packages/fa/37/45185cb5abbc30d7257104c434fe0b07e5a195a6847506c074527aa599ec/Click-7.0-py2.py3-none-any.whl (81kB)
   Collecting Jinja2>=2.10 (from flask->-r requirements.txt (line 1))
     Downloading https://files.pythonhosted.org/packages/1d/e7/fd8b501e7a6dfe492a433deb7b9d833d39ca74916fa8bc63dd1a4947a671/Jinja2-2.10.1-py2.py3-none-any.whl (124kB)
   Collecting MarkupSafe>=0.23 (from Jinja2>=2.10->flask->-r requirements.txt (line 1))
     Downloading https://files.pythonhosted.org/packages/b9/2e/64db92e53b86efccfaea71321f597fa2e1b2bd3853d8ce658568f7a13094/MarkupSafe-1.1.1.tar.gz
   Building wheels for collected packages: MarkupSafe
     Building wheel for MarkupSafe (setup.py): started
     Building wheel for MarkupSafe (setup.py): finished with status 'done'
     Stored in directory: /root/.cache/pip/wheels/f2/aa/04/0edf07a1b8a5f5f1aed7580fffb69ce8972edc16a505916a77
   Successfully built MarkupSafe
   Installing collected packages: itsdangerous, Werkzeug, click, MarkupSafe, Jinja2, flask, redis
   Successfully installed Jinja2-2.10.1 MarkupSafe-1.1.1 Werkzeug-0.15.2 click-7.0 flask-1.0.2 itsdangerous-1.1.0 redis-3.2.1
   Removing intermediate container 38a3c9656713
    ---> b1d796e7dbd3
   Step 5/5 : CMD ["python", "app.py"]
    ---> Running in 56a7fc68127f
   Removing intermediate container 56a7fc68127f
    ---> 307969069ef2
   Successfully built 307969069ef2
   Successfully tagged composetest_web:latest
   WARNING: Image for service web was built because it did not already exist. To rebuild this image you must use `docker-compose build` or `docker-compose up --build`.
   Pulling redis (redis:alpine)...
   alpine: Pulling from library/redis
   bdf0201b3a05: Pull complete
   542e0c4f2f18: Pull complete
   cbf113c39f65: Pull complete
   09158274ea6c: Pull complete
   ffc2a2e9a3a6: Pull complete
   bcdc222d2d8e: Pull complete
   Digest: sha256:457e5794dc9a18d4df3551afb7cc9a94a3f7403511797dafc469f89bfd6f5cb0
   Status: Downloaded newer image for redis:alpine
   Creating composetest_web_1   ... done
   Creating composetest_redis_1 ... done
   Attaching to composetest_web_1, composetest_redis_1
   redis_1  | 1:C 10 Apr 2019 20:16:48.253 # oO0OoO0OoO0Oo Redis is starting oO0OoO0OoO0Oo
   redis_1  | 1:C 10 Apr 2019 20:16:48.253 # Redis version=5.0.4, bits=64, commit=00000000, modified=0, pid=1, just started
   redis_1  | 1:C 10 Apr 2019 20:16:48.254 # Warning: no config file specified, using the default config. In order to specify a config file use redis-server /path/to/redis.conf
   redis_1  | 1:M 10 Apr 2019 20:16:48.258 * Running mode=standalone, port=6379.
   redis_1  | 1:M 10 Apr 2019 20:16:48.258 # WARNING: The TCP backlog setting of 511 cannot be enforced because /proc/sys/net/core/somaxconn is set to the lower value of 128.
   redis_1  | 1:M 10 Apr 2019 20:16:48.258 # Server initialized
   redis_1  | 1:M 10 Apr 2019 20:16:48.258 # WARNING overcommit_memory is set to 0! Background save may fail under low memory condition. To fix this issue add 'vm.overcommit_memory = 1' to /etc/sysctl.conf and then reboot or run the command 'sysctl vm.overcommit_memory=1' for this to take effect.
   redis_1  | 1:M 10 Apr 2019 20:16:48.258 # WARNING you have Transparent Huge Pages (THP) support enabled in your kernel. This will create latency and memory usage issues with Redis. To fix this issue run the command 'echo never > /sys/kernel/mm/transparent_hugepage/enabled' as root, and add it to your /etc/rc.local in order to retain the setting after a reboot. Redis must be restarted after THP is disabled.
   redis_1  | 1:M 10 Apr 2019 20:16:48.258 * Ready to accept connections
   web_1    |  * Serving Flask app "app" (lazy loading)
   web_1    |  * Environment: production
   web_1    |    WARNING: Do not use the development server in a production environment.
   web_1    |    Use a production WSGI server instead.
   web_1    |  * Debug mode: on
   web_1    |  * Running on http://0.0.0.0:5000/ (Press CTRL+C to quit)
   web_1    |  * Restarting with stat
   web_1    |  * Debugger is active!
   web_1    |  * Debugger PIN: 322-576-353
docker-compose会获取redis的镜像,然后和我们编写的代码一起打包成为新的镜像,之后启动服务。 2)在浏览器里输入http://MACHINE_VM_IP:5000/查看app运行状态 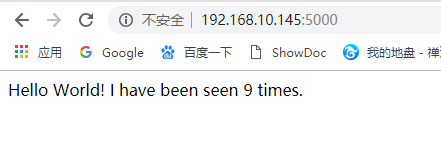 3)刷新页面可以看到计数器累加
 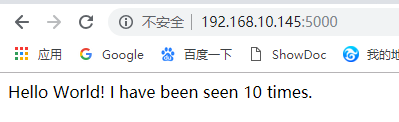 4)切换一个终端窗口执行
docker image ls可以看到刚刚创建的镜像 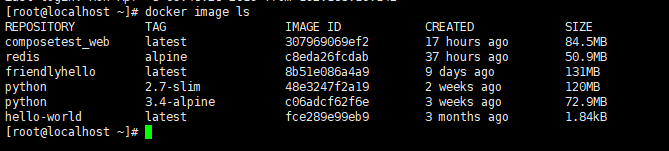 5)可以使用docker inspect
   [root@localhost ~]# docker inspect composetest_web:latest
   [
       {
           "Id": "sha256:307969069ef2de8701eb0c28b31f6a2894668cb0ad5a0f567069e92679e1aac6",
           "RepoTags": [
               "composetest_web:latest"
           ],
           "RepoDigests": [],
           "Parent": "sha256:b1d796e7dbd3e0c95443d72d752050cda52fc0c6b5d23bbb098cd7ffcc011cc3",
           "Comment": "",
           "Created": "2019-04-10T20:16:27.698232393Z",
           "Container": "56a7fc68127f2423a6d092880b9fbfc13f32a1e1244e80801751352e9c271cfd",
           "ContainerConfig": {
               "Hostname": "56a7fc68127f",
               "Domainname": "",
               "User": "",
               "AttachStdin": false,
               "AttachStdout": false,
               "AttachStderr": false,
               ...
   [root@localhost ~]# docker inspect 307969069ef2
   [
       {
           "Id": "sha256:307969069ef2de8701eb0c28b31f6a2894668cb0ad5a0f567069e92679e1aac6",
           "RepoTags": [
               "composetest_web:latest"
           ],
           "RepoDigests": [],
           "Parent": "sha256:b1d796e7dbd3e0c95443d72d752050cda52fc0c6b5d23bbb098cd7ffcc011cc3",
           "Comment": "",
           "Created": "2019-04-10T20:16:27.698232393Z",
           "Container": "56a7fc68127f2423a6d092880b9fbfc13f32a1e1244e80801751352e9c271cfd",
           "ContainerConfig": {
               "Hostname": "56a7fc68127f",
               "Domainname": "",
               "User": "",
               "AttachStdin": false,
               "AttachStdout": false,
               "AttachStderr": false,
               "Tty": false,
               "OpenStdin": false,
               "StdinOnce": false,
               "Env": [
                   "PATH=/usr/local/bin:/usr/local/sbin:/usr/local/bin:/usr/sbin:/usr/bin:/sbin:/bin",
                   "LANG=C.UTF-8",
                   "GPG_KEY=97FC712E4C024BBEA48A61ED3A5CA953F73C700D",
                   ...
6)可以在另一个窗口使用docker-compose down来停止应用,也可以在运行窗口使用ctrl+c停止
5.5 添加挂载卷
   version: '3'
   services:
     web:
       build: .
       ports:
        - "5000:5000"
       volumes:
        - .:/code
     redis:
       image: "redis:alpine"
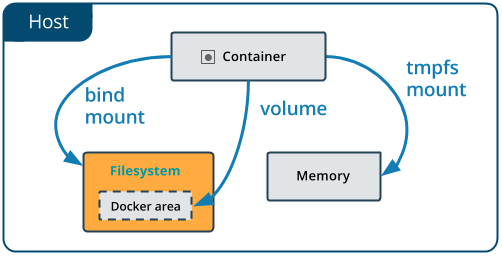
新增的volumn关键字的功能是把项目目录(当前目录)挂载到/code,这样就可以让我们在外部修改代码而无需重新打包应用 挂载卷在docker指令里面可以使用-v,--volumn和--mount,他们的区别是-v,--volumn会在容器内部自动创建目录,而--mount在目录 不存在的情况下会报错。
5.6 重新打包并运行app
   [root@localhost composetest]# docker-compose up
   WARNING: The Docker Engine you're using is running in swarm mode.

   Compose does not use swarm mode to deploy services to multiple nodes in a swarm. All containers will be scheduled on the current node.

   To deploy your application across the swarm, use `docker stack deploy`.

   Starting composetest_redis_1 ... done
   Recreating composetest_web_1 ... done
   Attaching to composetest_redis_1, composetest_web_1
   redis_1  | 1:C 11 Apr 2019 14:29:07.655 # oO0OoO0OoO0Oo Redis is starting oO0OoO0OoO0Oo
   redis_1  | 1:C 11 Apr 2019 14:29:07.655 # Redis version=5.0.4, bits=64, commit=00000000, modified=0, pid=1, just started
   redis_1  | 1:C 11 Apr 2019 14:29:07.655 # Warning: no config file specified, using the default config. In order to specify a config file use redis-server /path/to/redis.conf
   redis_1  | 1:M 11 Apr 2019 14:29:07.657 * Running mode=standalone, port=6379.
   redis_1  | 1:M 11 Apr 2019 14:29:07.657 # WARNING: The TCP backlog setting of 511 cannot be enforced because /proc/sys/net/core/somaxconn is set to the lower value of 128.
   redis_1  | 1:M 11 Apr 2019 14:29:07.657 # Server initialized
   redis_1  | 1:M 11 Apr 2019 14:29:07.657 # WARNING overcommit_memory is set to 0! Background save may fail under low memory condition. To fix this issue add 'vm.overcommit_memory = 1' to /etc/sysctl.conf and then reboot or run the command 'sysctl vm.overcommit_memory=1' for this to take effect.
   redis_1  | 1:M 11 Apr 2019 14:29:07.658 # WARNING you have Transparent Huge Pages (THP) support enabled in your kernel. This will create latency and memory usage issues with Redis. To fix this issue run the command 'echo never > /sys/kernel/mm/transparent_hugepage/enabled' as root, and add it to your /etc/rc.local in order to retain the setting after a reboot. Redis must be restarted after THP is disabled.
   redis_1  | 1:M 11 Apr 2019 14:29:07.666 * DB loaded from disk: 0.009 seconds
   redis_1  | 1:M 11 Apr 2019 14:29:07.666 * Ready to accept connections
   web_1    |  * Serving Flask app "app" (lazy loading)
   web_1    |  * Environment: production
   web_1    |    WARNING: Do not use the development server in a production environment.
   web_1    |    Use a production WSGI server instead.
   web_1    |  * Debug mode: on
   web_1    |  * Running on http://0.0.0.0:5000/ (Press CTRL+C to quit)
   web_1    |  * Restarting with stat
   web_1    |  * Debugger is active!
   web_1    |  * Debugger PIN: 149-546-817
5.7 更新应用
因为应用代码现在是被挂载在外部,所以我们可以修改app.py的代码之后刷新浏览器观察结果 比如修改Hello World!为Hello Docker!,然后刷新浏览器会发现Hello World!变成了Hello Docker!,同时累计数目仍然递增。 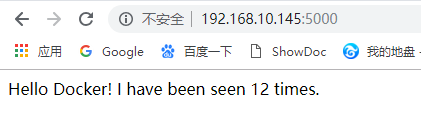
5.8 一些其他的命令
1.后台运行服务可以使用-d命令,然后使用docker-compose ps查看当前运行的服务详情
   [root@localhost composetest]# docker-compose up -d
   Starting composetest_web_1   ... done
   Starting composetest_redis_1 ... done
   [root@localhost composetest]# docker-compose ps
          Name                      Command               State           Ports
   -------------------------------------------------------------------------------------
   composetest_redis_1   docker-entrypoint.sh redis ...   Up      6379/tcp
   composetest_web_1     python app.py                    Up      0.0.0.0:5000->5000/tcp
docker-compose run命令可以提供对服务的一次性执行的命令,比如查看web服务的环境变量[root@localhost composetest]# docker-compose run web env PATH=/usr/local/bin:/usr/local/sbin:/usr/local/bin:/usr/sbin:/usr/bin:/sbin:/bin HOSTNAME=0f0fd6207760 TERM=xterm LANG=C.UTF-8 GPG_KEY=97FC712E4C024BBEA48A61ED3A5CA953F73C700D PYTHON_VERSION=3.4.10 PYTHON_PIP_VERSION=19.0.3 HOME=/root- 如果是使用
docker-compose up -d启动的服务可以使用docker-compose stop来停止运行[root@localhost composetest]# docker-compose stop Stopping composetest_web_1 ... done Stopping composetest_redis_1 ... done - 使用
down命令可以停止所有内容,包括移除容器,如果带上--volumes可以移除实例中redis的容器[root@localhost composetest]# docker-compose down --volumes Removing composetest_web_run_3c7b4f3b0319 ... done Removing composetest_web_1 ... done Removing composetest_redis_1 ... done Removing network composetest_default - 使用
docker-compose --help可以查看帮助,或者安装 command completionbash和zsh shell命令
至此docker-compose的基本操作就讲完了