3.docker 容器(打包运行)
1. 目标
编辑Dockerfile,定义docker容器,打包镜像,运行APP。
2. 预备条件
快速测试环境是否安装正确:
docker run hello-world
3. 介绍
以Docker的方式构建App需要了解App的层次结构,我们从App层次结构的底部开始,即容器。 在这个级别之上是服务,它定义了容器在生产中的行为,最后,在顶层是堆栈(本文讲的是容器,服务和堆栈将在后面介绍)。
```
Stack
Services
Container
```    一般情况下,如果要开始编写Python应用程序,首先要做的就是在机器上安装Python运行环境。    这就面临一种情况,我们的机器上面的环境要和应用完美契合,同时也要在运行的生产环境契合。    而使用Docker,只需要一个基本的可运行的Python镜像,然后构以此为基础,便能确保应用程序、和它的依赖项一起运行。
4 编辑Dockerfile定义docker容器
4.1 Dockerfile介绍
Dockerfile是用来定义容器内部的运行环境的,在这个环境中,对网络接口和磁盘驱动器等资源的访问是虚拟化的,与外部的环境是隔离的。 因此,我们需要将端口映射到外部系统,并明确要将哪些文件“复制”到该环境。做完这些之后我们就能构建我们的应用并且能够保证不管在什么环境下运行, 它的表现都是一样的。
4.2 Dockerfile编写
创建一个空目录。在该目录下创建一个名为Dockerfile的文件,将以下内容复制并粘贴到该文件中,然后保存。
Dockerfile
   # Use an official Python runtime as a parent image
   FROM python:2.7-slim

   # Set the working directory to /app
   WORKDIR /app

   # Copy the current directory contents into the container at /app
   COPY . /app

   # Install any needed packages specified in requirements.txt
   RUN pip install --trusted-host pypi.python.org -r requirements.txt

   # Make port 80 available to the world outside this container
   EXPOSE 80

   # Define environment variable
   ENV NAME World

   # Run app.py when the container launches
   CMD ["python", "app.py"]
在同目录下面创建app.py和requirements.txt文件
requirements.txt
   Flask
   Redis
app.py
   from flask import Flask
   from redis import Redis, RedisError
   import os
   import socket

   # Connect to Redis
   redis = Redis(host="redis", db=0, socket_connect_timeout=2, socket_timeout=2)

   app = Flask(__name__)

   @app.route("/")
   def hello():
       try:
           visits = redis.incr("counter")
       except RedisError:
           visits = "<i>cannot connect to Redis, counter disabled</i>"

       html = "<h3>Hello {name}!</h3>" \
              "<b>Hostname:</b> {hostname}<br/>" \
              "<b>Visits:</b> {visits}"
       return html.format(name=os.getenv("NAME", "world"), hostname=socket.gethostname(), visits=visits)

   if __name__ == "__main__":
       app.run(host='0.0.0.0', port=80)
5 构建应用(build APP)
5.1 查看当前目录应该有这三个文件
   [root@localhost build]# ls
   app.py  Dockerfile  requirements.txt
5.2 执行build命令
创建Docker image,使用–tag选项定义标签,也可以使用-t缩写
docker build --tag=friendlyhello .
或者
   [root@localhost build]# docker build -t friendlyhello .
   Sending build context to Docker daemon   5.12kB
   Step 1/7 : FROM python:2.7-slim
   2.7-slim: Pulling from library/python
   Get https://registry-1.docker.io/v2/library/python/manifests/sha256:c5c03798aeec64be5d962205db2fdacc66b7beb7a2d3bdad2f2d84fda5f53dfb: dial tcp 34.233.151.211:443: i/o timeout
PS:我们访问docker官方的仓库很慢,可以修改/etc/docker/daemon.json(没有就新增一个),添加国内的镜像加速例如阿里云
   {
    "registry-mirrors": ["https://xxxxxx.mirror.aliyuncs.com","https://registry.docker-cn.com"]
   }
修改完需要重启docker service docker restart
5.3 查看打包好的image
   [root@localhost build]# docker image ls
   REPOSITORY          TAG                 IMAGE ID            CREATED             SIZE
   friendlyhello       latest              8b51e086a4a9        2 hours ago         131MB
   python              2.7-slim            48e3247f2a19        6 days ago          120MB
   hello-world         latest              fce289e99eb9        3 months ago        1.84kB
6 运行应用(run APP)
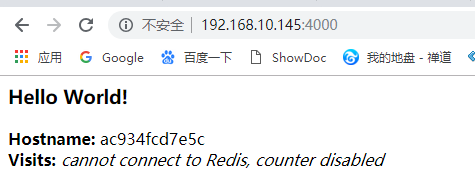
运行应用程序,使用-p将机器的端口4000映射到容器的已发布端口80
   [root@localhost build]# docker run -p 4000:80 friendlyhello
    * Serving Flask app "app" (lazy loading)
    * Environment: production
      WARNING: Do not use the development server in a production environment.
      Use a production WSGI server instead.
    * Debug mode: off
    * Running on http://0.0.0.0:80/ (Press CTRL+C to quit)
   192.168.10.142 - - [02/Apr/2019 13:22:09] "GET / HTTP/1.1" 200 -
   192.168.10.142 - - [02/Apr/2019 13:22:09] "GET /favicon.ico HTTP/1.1" 404 -
7 浏览器访问已启动的应用

PS:上面显示cannot connect to Redis, counter disabled是因为Redis没有运行(因为我们只安装了Python库,而没有安装Redis本身), 所以我们应该产生错误消息是意料之中的(查看上面的app.py代码就能看到)。